Thursday, February 17, 2011

Easter Egg Craft

For Easter I wanted to do something cute that wasn't too expensive. Those seem to be the theme of almost all my crafts though. Who says " I want to make a craft that is going to cost an arm and a leg and it has to turn out ugly!" I take it if you are interested in this blog you are reading because of those 2 things I mentioned: Cost-effective and Cute! Well you are in luck because this craft is exactly that! In my future posts you will see better step by step pictures on each craft but for now you will just have to deal with just the written instructions:

Materials Needed: total cost: $2.50 each
*A piece of 2x4 5 inches long (approx .50)
*Easter Eggs on a stick (purchased at Roberts for $2 for a bag of 4)
*Easter Grass ($2 for a large bag of paper Easter grass also from Roberts)
*Ribbon, 12 inches(The bow shown was already on the Egg in the bag but I gave the option to add a better ribbon)
*Hot glue gun
*Pastel craft paints ($2 for two colors)
*Vinyl saying "EASTER the one time it's OK to put all your eggs in one basket"

 Instructions

1. Sand wood down until smooth and drill a hole in the center top of the block.
2. Paint the wood block with two coats of paint.
3. Glue in the drilled hole the egg on a stick.
4. Glue Easter grass on top of the block.
5.Apply the vinyl saying centered on the front of the block.
*optional: you can change the ribbon on the stick to make it look better. You can also add a borber using a different pastel color and the end of a NEW pencil eraser.

Happy Crafting!

Scrapbook gift box

One of my friends made this particular box, but we all got together at my house and made our own variations. I wanted to share this idea though because I thought it was darling and incredibly creative!
 This is the top with it closed
 The inside all flat
 The shot of the 3 flaps on each side
 The lid and box together
closer view of the detail made with chalk/stamp pads

I have the exact dimensions if you are interested in building one of your own. All you really need are about 2 dozen photos, about 6 sheets of scrapbook paper, chalk/stamp pad, corner punch, some glue, an hour of your time, and a cute bow for the lid! In the end you get a super cute box that you can customize for any occasion!

Friday, February 11, 2011

Ipod Valentines

 This was such a cute Valentine! I loved making these for Emma's class and they were super easy. I found it in Family fun, but here is a link for the actual ipod template. All you need are some conversation hearts, string and small reeses!

Sunday, January 16, 2011

Valentine's Day Blocks

These blocks are so fun because they say something cute together but apart they make no sense. The symbolism is ingenious! (FYI keep in mind my costs are just an average of what I typically pay)

Materials Needed:
*2 4x4 blocks 6 inches long ($1)
*1 piece of 12x12 Valentine themed scrapbooking paper ($.50)
*1 yard of Valentine ribbon($1)
*White craft paint ($1)
*Modge Podge ($4 for a bottle)
*Foam paint brush (.50)
*Vinyl Saying "U COMPLETE ME"
Instructions:
1. Sand blocks until smooth.
2. Apply white paint to blocks and let dry for 20 minutes.
3. Cut paper to fit the blocks.
4. Apply a LIGHT coat of Modge Podge on the back of the paper and attach to the front of the blocks.
5. Cover the front of the paper now attached to the blocks with another light coat of Modge Podge.
6. Add the vinyl saying to the front of the blocks. Make sure to separate COMP from LETE to make it look right.
7. Add a cute bow to the first block.

Voila...Cute Valentine Decor!!!!


Friday, January 14, 2011

Mini Diaper Cake

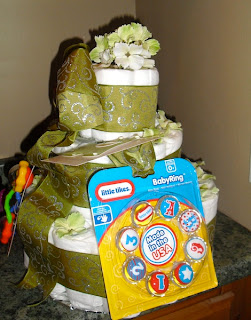
 If you have viewed my post of the larger diaper cake then this is just a top layer of a cake. It was for the daughter of a lady in my old neighborhood. it was quick, cute, and simple. This proves that you really don't have to go into too much intricate detail to make them fun!


the side shot showing the outfit tied to the top
This is the front with a cute saying I found

Thursday, September 23, 2010

Diaper Cakes


These make such wonderful baby shower gifts! They are great conversation pieces too! Here are the fun and easy steps:

First start with these supplies:
  • 60 Diapers (depending on how large or small you want the cake to be)
  • 3-4 yards of decorative ribbon
  • 3-5 small toys, blankets, hats, socks, etc.
  • Circular cardboard cutout
  • 1 small wooden dowel
  • Hot glue/gun
  • 3 yards of white tulle
  • 60 small hair elastics
  • 10 large newspaper elastics
  • 30 small decorative flowers or bows
  1. Take each diaper and roll from the bottom to the top and secure with a rubber-band in the center.
  2. Take 7 diapers and hold them together to form a circle and secure them with a large newspaper rubber band in the center. (this completes the top layer of the cake)
  3. Repeat step #2 and add an additional 10 diapers to form a larger circle. (this completes the 2nd level)
  4. Repeat step #2 and #3 and add an additional 16 diapers to form the largest circle. (this completes the bottom layer)
  5. Take the cardboard cutout and begin placing the bottom diaper layer and secure it to the cutout with a small amount of hot glue. (We want these diapers to be usable)
  6. Insert the wooden dowel in the center of the bottom layer and place the 2nd layer through the dowel and on top of the bottom layer.
  7. Add the top layer to the bottom 2 layers. (Make sure the dowel goes from the bottom layer straight through the top layer to ensure the cake won't topple over. Remove any extra length on the dowel)
  8. Apply the to tulle to each layer on the exterior and secure with hot glue and another large rubber band. Cut off any excess tulle.
  9. Use the hot glue to add the ribbon to the center of each layer.
  10. Make and mold three large bows, then glue on the bows to the front of each layer in the center on top of the ribbon you placed in step #9.
  11. To add the toys and other miscellaneous item take 4 inches of ribbon per item and weave it around or through the object to form a loop. Take the cut ends of ribbon and with hot glue tuck them under a layer of ribbon on various locations on the cake.
  12. Finish the cake by adding a few flowers or bows to the tops of each diaper that is exposed. 
  13. Take a good look at your darling creation and be proud to give such a thoughtful gift to the  lucky mother-to-be.
Completion time: 1 hour approx.

I have a very basic cake shown here so feel free to elaborate as necessary or tone it down a bit if you'd like. I am sure there are a lot of great variations of these but this is the one I felt works the best. It makes me excited every time I am invited to a baby shower! Good luck and I hope you enjoy this fun craft!

Sunday, September 19, 2010

Let the Crafting Begin...


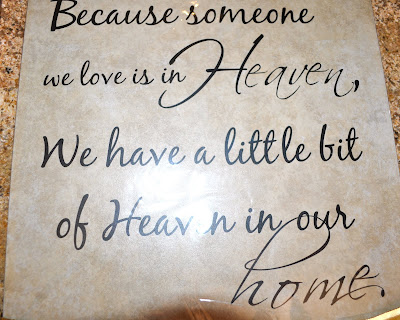
In an effort to show my creative side, thus a blog was born! Here I plan to show my fun, creative, sometimes trendy, and most definitely diverse ideas! I am so excited about this new endeavor that I can't put enough emphasis into this post no matter how many exclamation marks I put !!!!!!!!!!!!!!!!!!!!!!!!!!!!!!!!!!!!!!!!!!!!!!!!!!!!!!!!!!! You get the idea... so buckle up and get ready because you are in for a treat! Here is a sample of gift I made for a friend of mine whose Mother died a few weeks ago. 12x12 tile: $2.50, Vinyl cutout made on cri-cut: $3, total cost: $5.50! It was a cute and simple way to say I am so deeply sorry for your loss and here is something to remember her by in a unique way! More ideas to come....